<h3><strong>Trekking in Aconcagua</strong></h3>
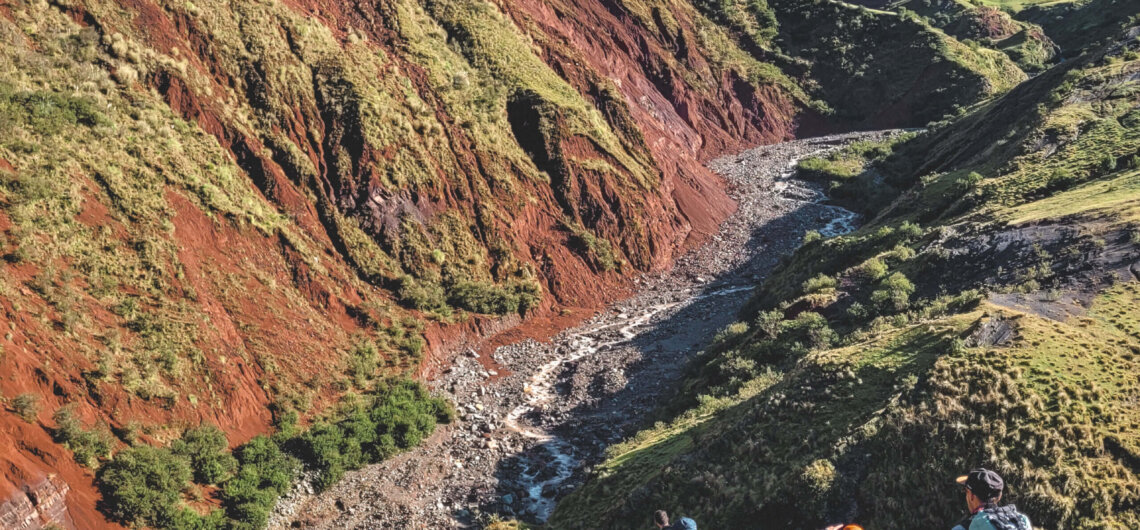
<strong>Mount Aconcagua</strong>, the highest mountain in America, is an emblematic destination for trekking and nature lovers. Among the many options it offers, there are two routes that stand out especially for those who want to experience this Andean giant without trying to reach its summit: the <strong>Trekking to the Mirador de la Pared Sur</strong> and the <strong>Trekking to Base Camp (Plaza de Mulas).</strong> These experiences allow you to explore and get to know the park's majestic surroundings, enjoy impressive views of its most important glaciers, and experience the spirit of adventure characteristic of high altitude camps.
Below, we tell you everything you need to know about these two unmissable routes, as well as useful information on prices, equipment and tips for planning your <a href="https://www.huka.com.ar/en/aconcagua/"><strong>excursion to Cerro Aconcagua</strong></a>.
<hr>
<h3><strong>Aconcagua Short Trek: Viewpoint of the South Wall</strong></h3>
The <strong>trek to the Aconcagua South Wall Lookout</strong> is perfect if you are looking for a few days tour and enjoy the breathtaking views of this mountain. It is one of the most popular options for those who want to experience the park environment without embarking on the long <strong>trek to Aconcagua Base Camp</strong>, such as Plaza de Mulas.
<h4><strong>Technical details of the trekking to the Mirador de la Pared Sur:</strong></h4>
<ul>
<li><strong>Duration:</strong> 2 to 3 days (round trip).</li>
<li><strong>Distance:</strong> About 8 to 12 kilometers, depending on the itinerary.</li>
<li><strong>Maximum height:</strong> Approximately 4,100 meters.</li>
<li><strong>Difficulty:</strong> Easy to Moderate. Ideal for people with no previous experience and good physical condition. </li>
</ul>
You must spend at least one night at Camp Confluencia. The most exciting point of the tour is to reach the viewpoint, where you will have a privileged view of the imposing <strong>South Wall of Mount Aconcagua</strong>, one of the most famous and admired faces by mountaineers. From here, you will be able to observe the hanging glaciers and connect with the highest mountain in America.
<hr>
<h3><strong>Trekking to Aconcagua Base Camp: Plaza de Mulas</strong></h3>
If you have more time and are looking for a greater challenge, the <strong>trek to Aconcagua base camp</strong>, known as Plaza de Mulas, is the best alternative. This is the base point for climbers attempting the summit, but it is also a stand-alone attraction for those who wish to enjoy unique landscapes in a multi-day adventure.
<h4><strong>Technical details of the trekking to Plaza de Mulas:</strong></h4>
<ul>
<li><strong>Duration:</strong> 4 to 6 days (round trip).</li>
<li><strong>Total distance:</strong> Between 35 and 45 kilometers, depending on the itinerary.</li>
<li><strong>Maximum height:</strong> 4,300 meters (Plaza de Mulas).</li>
<li><strong>Difficulty:</strong> Moderate, due to the altitude and the distance covered. Ideal for people in good physical condition. </li>
</ul>
This <strong>trek to Aconcagua base camp</strong> is ideal if you are looking for a more intense experience. You will enjoy the spectacular scenery and views of the glaciers at base camp, sleeping in Confluencia and visiting the <strong>Mirador de la Pared Sur </strong>to better acclimatize to the altitude before the ascent to Plaza de Mulas.
<hr>
<h3><strong>Aconcagua 2025 Trekking and Permits Prices</strong></h3>
<strong>Aconcagua trekking</strong> has a cost that varies depending on the duration, the type of route and the services included. Here is an approximate idea of the prices for 2025:
<ul>
<li><strong><a href="https://www.huka.com.ar/en/travel/trekking-to-the-south-wall-of-aconcagua-mirador-plaza-francia-4100-m-a-s-l-copia/">Trekking to the Aconcagua South Wall Lookout</a>:</strong>
Estimated price: USD 350-550 per person (in guided group excursions).</li>
<li><strong><a href="https://www.huka.com.ar/en/travel/trekking-to-aconcagua-base-camp-plaza-de-mulas-4350-masl/">Trekking to Aconcagua Base Camp (Plaza de Mulas)</a>:</strong>
Estimated price: USD 900-1,200 per person, depending on the days and services contracted (guides, mules, camping equipment, meals, etc.).</li>
</ul>
Additionally, a<strong>Trekking Permit </strong>must be paid to enter the Aconcagua Provincial Park.
<img class="" src="https://www.andes-vertical.com/wp-content/uploads/2022/11/Cuadro-Tarifas-Aconcagua-2024-25-02-3-1-1200x401.png" width="943" height="315">
<hr>
<h3><strong>Best Time for Trekking Cerro Aconcagua</strong></h3>
The austral summer, between December and March, is the best time for any <strong>trekking on Mount Aconcagua</strong>. During these months, weather conditions are more stable, with higher temperatures and less chance of precipitation.
However, do not forget that temperatures in the mountains can drop rapidly, especially in the afternoon or at night. Always wear appropriate clothing, ideally using the <a href="https://www.huka.com.ar/en/layered-clothing/">layering system</a> to cope with sudden changes in weather.
<hr>
<h3><strong>Necessary Equipment for the Trekking</strong></h3>
Whether you choose to <strong>trek to Aconcagua base camp</strong> or a shorter route such as the Mirador de la Pared Sur, it is essential to have the right equipment to ensure your safety and comfort:
<ul>
<li><strong>Footwear:</strong> Waterproof and comfortable trekking boots.</li>
<li><strong>Clothing:</strong> Layered clothing (warm clothes, waterproof jacket, gloves, hat).</li>
<li><strong>Hydration:</strong> Water bottles and water purification tablets, as mountain water may not be safe to drink untreated.</li>
<li><strong>Sun protection:</strong> Sunglasses, hat and high protection sunscreen.</li>
<li><strong>Specific equipment:</strong> trekking poles, 30-40 liter backpack, warm and insulating sleeping bag (if you sleep in a tent).</li>
</ul>
<hr>
<h3><strong>Frequently Asked Questions about Aconcagua Trekking</strong></h3>
<h4><strong>Is it necessary to hire a guide for the Aconcagua trekking?</strong></h4>
It is not mandatory for shorter routes, but it is recommended, especially if you are not familiar with the terrain. For longer routes, such as the <strong>hike to Aconcagua base camp (Plaza de Mulas)</strong>, an experienced guide is suggested.
<h4><strong>2. Is there wifi or cellular signal in the Aconcagua campsites?</strong></h4>
Limited wifi services are available at some of the main campsites, such as Confluencia and Plaza de Mulas. Cellular signal is very weak or non-existent in most of the park, so it is advisable not to rely on it and to plan any important communication before entering the park.
<h4><strong>3. What services are available at the Aconcagua camps?</strong></h4>
In campsites such as Confluencia and Plaza de Mulas, you will find basic services and some additional ones:
<ul>
<li><strong>Chemical or ecological toilets:</strong> Available in all main camps.</li>
<li><strong>Rest areas:</strong> Domes or tents equipped for resting, with 220v electricity and wi-fi.</li>
<li><strong>Meals:</strong> The guided services include full board during the trekking.</li>
<li><strong>Medical assistance:</strong> There are medical checkpoints at the main camps to monitor acclimatization and attend to emergencies.</li>
</ul>
<h4><strong>How long does it take to acclimatize?</strong></h4>
Acclimatization depends on each person, but we recommend at least one day of rest at an intermediate camp such as Confluencia, before continuing on to Plaza de Mulas or higher altitudes.
<h4><strong>5. What kind of food should I bring for the trekking?</strong></h4>
For day treks, you can carry a light lunch, energy snacks such as granola bars, nuts and dried fruits. For longer routes such as base camp, it is advisable to bring light, easy to prepare and high in calories. If you hire an agency, meals are included in the service, which is an advantage for not carrying so much weight.
<h4><strong>6. How cold can it get during the trekking?</strong></h4>
Temperatures on Aconcagua vary depending on altitude and time of day. On the Mirador de la Pared Sur trek, temperatures can range from 5°C to 20°C during the day, but drop to near 0°C at night. At Plaza de Mulas, nights tend to be much colder, with temperatures reaching -10 °C or lower. Wear appropriate clothing to cope with these changes.
<h4><strong>7. Are mules available to transport equipment?</strong></h4>
Yes, on the trek to Plaza de Mulas base camp you can hire the services of mules to transport your equipment and reduce the weight to be carried. The price of this service varies according to the distance and the total weight to be transported.
<h4><strong>8. What happens if I feel sick during the trek?</strong></h4>
If you experience symptoms of altitude sickness or any other physical problem, it is important to report it immediately to your guide or camp staff. At the main camps such as Confluencia and Plaza de Mulas, there are medical checkpoints where your condition can be evaluated and, if necessary, a descent can be coordinated for your safety.
<hr>
<h3><strong>Why Choose Aconcagua for Your Next Adventure?</strong></h3>
The <strong>Cerro Aconcagua treks</strong> are not only a sporting experience, but an opportunity to connect with America's highest mountain at its best. From short routes like the<strong>Short Trek to the Mirador de la Pared Sur</strong> to longer challenges like the<strong>Aconcagua Base Camp Hike</strong>, this mountain has something to offer to all levels of adventurers.
Now you know everything you need for your <strong>trekking to Mount Aconcagua,</strong> get ready, pack your backpack and live an unforgettable experience in the Mendocino Andes!
[tours_grid title_underline="on" description_words_limit="20" tour_category_ids_condition="IN" terms_operator="IN" tour_ids="4507,4493" number="2" price_style="default" show_categories="on" btn_more_text="View more" order="DESC" orderby="date"]
Trekking in Aconcagua
Mount Aconcagua, the highest mountain in America, is an emblematic destination for trekking and nature lovers. Among the many options it offers, there are two routes that stand out especially for those who want to experience this Andean giant without trying to reach its summit: the Trekking to the Mirador de la Pared Sur and the Trekking to Base Camp (Plaza de Mulas). These experiences allow you to explore and get to know the park’s majestic surroundings, enjoy impressive views of its most important glaciers, and experience the spirit of adventure characteristic of high altitude camps.
Below, we tell you everything you need to know about these two unmissable routes, as well as useful information on prices, equipment and tips for planning your excursion to Cerro Aconcagua.
Aconcagua Short Trek: Viewpoint of the South Wall
The trek to the Aconcagua South Wall Lookout is perfect if you are looking for a few days tour and enjoy the breathtaking views of this mountain. It is one of the most popular options for those who want to experience the park environment without embarking on the long trek to Aconcagua Base Camp, such as Plaza de Mulas.
Technical details of the trekking to the Mirador de la Pared Sur:
- Duration: 2 to 3 days (round trip).
- Distance: About 8 to 12 kilometers, depending on the itinerary.
- Maximum height: Approximately 4,100 meters.
- Difficulty: Easy to Moderate. Ideal for people with no previous experience and good physical condition.
You must spend at least one night at Camp Confluencia. The most exciting point of the tour is to reach the viewpoint, where you will have a privileged view of the imposing South Wall of Mount Aconcagua, one of the most famous and admired faces by mountaineers. From here, you will be able to observe the hanging glaciers and connect with the highest mountain in America.
Trekking to Aconcagua Base Camp: Plaza de Mulas
If you have more time and are looking for a greater challenge, the trek to Aconcagua base camp, known as Plaza de Mulas, is the best alternative. This is the base point for climbers attempting the summit, but it is also a stand-alone attraction for those who wish to enjoy unique landscapes in a multi-day adventure.
Technical details of the trekking to Plaza de Mulas:
- Duration: 4 to 6 days (round trip).
- Total distance: Between 35 and 45 kilometers, depending on the itinerary.
- Maximum height: 4,300 meters (Plaza de Mulas).
- Difficulty: Moderate, due to the altitude and the distance covered. Ideal for people in good physical condition.
This trek to Aconcagua base camp is ideal if you are looking for a more intense experience. You will enjoy the spectacular scenery and views of the glaciers at base camp, sleeping in Confluencia and visiting the Mirador de la Pared Sur to better acclimatize to the altitude before the ascent to Plaza de Mulas.
Aconcagua 2025 Trekking and Permits Prices
Aconcagua trekking has a cost that varies depending on the duration, the type of route and the services included. Here is an approximate idea of the prices for 2025:
Additionally, aTrekking Permit must be paid to enter the Aconcagua Provincial Park.

Best Time for Trekking Cerro Aconcagua
The austral summer, between December and March, is the best time for any trekking on Mount Aconcagua. During these months, weather conditions are more stable, with higher temperatures and less chance of precipitation.
However, do not forget that temperatures in the mountains can drop rapidly, especially in the afternoon or at night. Always wear appropriate clothing, ideally using the layering system to cope with sudden changes in weather.
Necessary Equipment for the Trekking
Whether you choose to trek to Aconcagua base camp or a shorter route such as the Mirador de la Pared Sur, it is essential to have the right equipment to ensure your safety and comfort:
- Footwear: Waterproof and comfortable trekking boots.
- Clothing: Layered clothing (warm clothes, waterproof jacket, gloves, hat).
- Hydration: Water bottles and water purification tablets, as mountain water may not be safe to drink untreated.
- Sun protection: Sunglasses, hat and high protection sunscreen.
- Specific equipment: trekking poles, 30-40 liter backpack, warm and insulating sleeping bag (if you sleep in a tent).
Frequently Asked Questions about Aconcagua Trekking
Is it necessary to hire a guide for the Aconcagua trekking?
It is not mandatory for shorter routes, but it is recommended, especially if you are not familiar with the terrain. For longer routes, such as the hike to Aconcagua base camp (Plaza de Mulas), an experienced guide is suggested.
2. Is there wifi or cellular signal in the Aconcagua campsites?
Limited wifi services are available at some of the main campsites, such as Confluencia and Plaza de Mulas. Cellular signal is very weak or non-existent in most of the park, so it is advisable not to rely on it and to plan any important communication before entering the park.
3. What services are available at the Aconcagua camps?
In campsites such as Confluencia and Plaza de Mulas, you will find basic services and some additional ones:
- Chemical or ecological toilets: Available in all main camps.
- Rest areas: Domes or tents equipped for resting, with 220v electricity and wi-fi.
- Meals: The guided services include full board during the trekking.
- Medical assistance: There are medical checkpoints at the main camps to monitor acclimatization and attend to emergencies.
How long does it take to acclimatize?
Acclimatization depends on each person, but we recommend at least one day of rest at an intermediate camp such as Confluencia, before continuing on to Plaza de Mulas or higher altitudes.
5. What kind of food should I bring for the trekking?
For day treks, you can carry a light lunch, energy snacks such as granola bars, nuts and dried fruits. For longer routes such as base camp, it is advisable to bring light, easy to prepare and high in calories. If you hire an agency, meals are included in the service, which is an advantage for not carrying so much weight.
6. How cold can it get during the trekking?
Temperatures on Aconcagua vary depending on altitude and time of day. On the Mirador de la Pared Sur trek, temperatures can range from 5°C to 20°C during the day, but drop to near 0°C at night. At Plaza de Mulas, nights tend to be much colder, with temperatures reaching -10 °C or lower. Wear appropriate clothing to cope with these changes.
7. Are mules available to transport equipment?
Yes, on the trek to Plaza de Mulas base camp you can hire the services of mules to transport your equipment and reduce the weight to be carried. The price of this service varies according to the distance and the total weight to be transported.
8. What happens if I feel sick during the trek?
If you experience symptoms of altitude sickness or any other physical problem, it is important to report it immediately to your guide or camp staff. At the main camps such as Confluencia and Plaza de Mulas, there are medical checkpoints where your condition can be evaluated and, if necessary, a descent can be coordinated for your safety.
Why Choose Aconcagua for Your Next Adventure?
The Cerro Aconcagua treks are not only a sporting experience, but an opportunity to connect with America’s highest mountain at its best. From short routes like theShort Trek to the Mirador de la Pared Sur to longer challenges like theAconcagua Base Camp Hike, this mountain has something to offer to all levels of adventurers.
Now you know everything you need for your trekking to Mount Aconcagua, get ready, pack your backpack and live an unforgettable experience in the Mendocino Andes!